Homeschool Conference!!!


Look at all those beautiful little feet two people can create!

Look at all those beautiful little feet two people can create!
Showing posts with label Gluten Free. Show all posts

Wednesday, November 27, 2013

The Challege ~ GF Dinner Rolls for Thanksgiving Dinner!

I'm always up for a challenge!

I have finally perfected a bread recipe 
that I have pretty much fallen in love with,
(Because of that,
I don't cook it all that often...
I really don't need to eat a whole loaf in one setting, 
and believe me, 
it's that yummy, I just might be tempted!)

Well...bread is great, but it's not PERFECT
when it comes to a Thanksgiving FEAST,
so...

I did a little playing around and came up with 
a Super Yummy GF Dinner Roll Recipe topped off with Cinnamon Honey Butter!
Is your mouth watering yet???  It should be...so, so good!!!

Here we go...

2 C GF Mix *
1 C Featherlight Mix *
1/3 C Sugar
2 1/2 tsp xanthan gum
2 tsp salt
3 tsp yeast
1/4 C Veggie Oil or Olive Oil **
(I prefer the veggie oil as it does not have a powerful flavor)
1 1/4 C Hot Water
2 tsp rice vinegar
3 eggs

*  Recipes for flour mixes found here
** Side note:  IF I were to be making these for an event other than Thanksgiving, and I wished for a little more flavor in my dinner rolls, I would definitely use Olive Oil and then I'd toss in a tsp or two of my favorite Italian seasonings...yummmm!

In the bottom of your mixing bowl 
( love my kitchen aid )


combine your flours, sugar, xanthan gum and salt.
Then pour the yeast right on top BUT DON'T MIX IT IN!

Just let it sit there for a few while you
grab another bowl,
(I love to use my big Pyrex measuring bowl for this step)

Combine your hot water, oil and vinegar
(yes, it can be hot, because it cools with the oil and vinegar)

Pour this over the top of your yeast 
and set the timer for 3 minutes.
Don't mix, just let it staring working its magic.
After 3 minutes you can start to mix on low speed, then add eggs.  
Mix until well combined.
Set your timer, again for 3 minutes, and beat on high speed.

While the dough is doing it's thing, 
get out 2 cupcake/muffin pans
and grease generously.

About the time you are done with that,
your timer should be beeping away...
...stop the mixing,
scrape down the sides of the mixing bowl,
and this is what you should have.
It will be a bit gooey.  
(Not at all like regular Bread Dough)


Fill the muffin cups to about 1/2 full...
like so ~ 


This recipe will fill 2 pans,
yielding 24 dinner rolls.


Allow to rise for 45 minutes...
they will reach the top of the cup and maybe even just a bit more.

While they are rising,
set your oven to 350
making sure to have your oven rack in the middle.

If it's too low, they just don't cook quite so nicely,
yes, I found out the hard way.  Darn it!

Once they have risen nicely, 
pop 'em in the oven for 18-20 minutes...
mine come out pretty perfect at 19 minutes.
The tops will be golden, in fact, they are pretty golden all around.

Tip them out on your cooling rack and 


serve with cinnamon honey butter!
Cinnamon Honey Butter is a cinch to make ~
and it's perfect for Thanksgiving!

1/2 C Butter
1/4 C Honey
1 tsp Cinnamon

Combine and whip until light and fluffy!

BONUS:
IF you are looking for a flaky, delish PIE CRUST...search no further,
I've got one for you here!

Wishing you each a beautiful day 
filled with all that foods 
that make your 
taste buds do a happy dance!!!

Wednesday, December 5, 2012

Texas Grilled Chicken with Lime Butter and Mexican Rice with Creamy Tomatillo and Cilantro Dressing

Oh my goodness...

Are you ready for the yummiest dinner EVER???

This is so tasty that my mouth is actually watering just thinking about it!!!

YOU WILL WANT TO MAKE THIS ONE...don't even give it a second thought, just get all your ingredients together and get busy...you are gonna WOW everyone who eats it, I PROMISE!!!

First, let's make a little marinade and get that chicken doin' it's thing!

Texas Grilled Chicken with Lime Butter

You will need:
4 -5 large chicken breasts,
set them to the side to rest
while you combine the following for your spice seasoning marinade:
(JUST A LITTLE NOTE HERE:
if you are feeding an army, like I do...
You can easily adjust this recipe, just double it.
OR if you are preparing it for a dinner party, quadruple the hummer and make a load of people smile!)
2 Tbsp Cinnamon
2 Tbsp Chili Powder
2 Tbsp Brown Sugar
2 tsp Cocoa powder
salt and pepper (probably a tsp of each...or more if you prefer)
5 Tbsp Olive Oil
3 Tbsp Balsamic Vinegar
Stir together well...then add a little water (just a tsp or so at a time...you just want this to be runny enough to coat your chicken breasts well on both sides)

Coat the chicken breasts and let them hang out for a while...you decide...could be for as little as 30 minutes or so -- up to all afternoon if you stick them in the fridge.
When ready, grill over medium heat -- about 7-8 minutes each side.

Drizzle with lime butter: 
(Don't be tempted to leave this off thinking the chicken will have enough flavor ~ even though it really does ~ but I'm tellin' ya this drizzle is to die for, so take just a minute and throw it together, you'll be so happy you did!)
1/2 C melted butter
1 Tbsp fresh lime juice
1 Serrano Chili, minced
2 Tbsp minced onion
Handful of cilantro, chopped

Mix all together and drizzle away over the top of your grilled chicken breasts...
Garnish with lime wedge and serve with the delish Rice Recipe.

Alrighty...now for that deeeeelicious rice recipe...

Mexican Rice with Creamy Tomatillo and Cilantro Dressing

Ingredients for Rice:
1 Tbsp Olive Oil
1 large white or yellow onion, chopped
2 cloves garlic, minced
1 small can chopped mild green chiles
2 C Brown Rice
3 1/2 C chicken stock
salt and pepper

Heat oil in large saucepan over medium heat...toss in onion, garlic and green chiles.  Cook until onion is soft, about 5 - 10 min.  Mix in rice, stir about 2 minutes.  Add chicken stock, bring to a boil.  Reduce heat to low and cover...cook until rice is tender and broth is absorbed.  (BROWN RICE takes a little longer to cook, so be patient...it is so much tastier than white rice, you'll be glad you tried it!)
Turn off heat and let rice rest covered for about 5 minutes, then add dressing and toss...then serve alongside your Texas Grilled Chicken!

Ingredients for Tomatillo and Cilantro Dressing:
First I'll give you the "real" recipe...
Then I'll give you "MY FAVORITE VERSION"...
both are super yummy!!!

2 C Mayonnaise
2 C Sour Cream
Bundle of fresh Cilantro, washed and with stems removed
3-5 Tomatillos, quartered
1 garlic clove
2 green onions
1 Serrano chile, seeded and chopped
1 tsp salt and pepper
2 tsp Cumin
3 Tbsp fresh lime juice (about 2 limes)

Place all ingredients in blender and blend until nice and smooth.
Give it a little taste, if it still needs a little extra zing, add in a bit more lime and possibly another pinch of salt and pepper.

Now for MY FAVORITE VERSION!!!!
Substitute the Mayo for Vanilla Bean Ice Cream...
You gotta try it, it is so, so, so divine!!!

It's actually a GREAT thing when you run out of certain ingredients...
that's when the magic happens!!!
I love "creating" in the kitchen...the things we can come up with are remarkable!

I do hope you'll love these recipes...they are some of my favorites...I've done a lot of tweaking to get them "JUST SO" ~ feel free to do the same if you desire.  :0)


Tuesday, November 20, 2012

Delish PIE CRUST ... I am SO happy!

Okay...I spent pretty much my entire day Monday determined to PERFECT and MASTER a Gluten Free Pie Crust...
I am happy to say that I accomplished what I set out to do!
At least as far as the taste factor goes...
still working on making them look PERFECT...
not sure if that is going to happen, but I'm giving it my best shot!
Those of you who know me well know that I don't give up easily!!!
The truth is though, if I can only have one thing pretty close to perfect, I'd prefer it were the taste...if it doesn't look quite so beautiful, maybe that's okay...it really is all about how happy it makes your mouth feel, right?

After spending most of the day, I started to wonder if it was really worth all the effort...
That was about the time for taste tests...yep, I'd say it was worth it!
Pretty yummy!

When my hubby came home from work,
he asked what we were having for dinner...
I looked at the clock a little shocked at the time and suggested,
"PIE?" 
He smiled his great smile,
so pie it was for the whole family...
I had all my little judges critiquing which crust was the tastiest and the flakiest and the prettiest...

I tried a couple different recipes, one that I found on the internet and another that I reworked from my FAV Recipe ever...
in the end, "THE CHOSEN ONE" turned out the be the one I had re-invented to be Gluten Free...
it turned out very flaky...and reminded me very much of a shortbread flavor and texture.
Oh Happy Day!!!

So without further adieu...let's get to making a delicious, flaky GF pie crust...

Your list of ingredients:

3 Cups All Purpose GF Flour Mix
2 Cups GF Mix for Goodies
(Flour Mixes are on a past post that you can find here: Gluten Free Flour Recipes...
3 Tbsp Brown Sugar (packed)
2 1/2 tsp Xanthan Gum
1 3/4 tsp Salt
2 tsp Baking Powder
1 Cup Crisco
1 Cup Butter
1 Egg
2 Tbsp apple cider vinegar
1 Cup (or less) Ice COLD water

Mix all dry ingredients together with a fork
Add Crisco and Butter, sliced into small pieces, into flour mixture.
Use your pastry blender for the first couple of minutes to help break up the fats.
Then put it to the side and let your fingers get busy...this works the very best!

The motion you will use is NOT like Kneading bread dough...
You are kind of massaging with your thumb and your first two fingers and just gently working the dough...This breaks up the fats and allows them to bind with the flours nicely.


You are done when your mixture resembles small pebbles in your bowl ~ a cornbread type consistency.


Now you will beat your egg and apple cider vinegar together and pour into your flour mixture, spreading it as evenly as possible over the top, then simply work it in with your fingers just as before.


Now take your ice cold water...I prefer to have a larger bowl of ice water and then pour it into my measuring cup...


SLOWLY add your water,
a LITTLE at a time until you end up with a nice ball of dough. 


IF you have some crumbly stuff on the bottom, LEAVE IT...
take out the nice ball you have and set it to the side. 
NOW you can add a smidgen more water to pick up your leftover crumblies...
when they have formed a nice ball, just stick them right into the middle of your larger ball...
they will mesh together very nicely.

At this point...
grab out your parchment paper
your rolling pin
and a little tapioca flour.

Also, this is a great time to choose the pie plate you will be using.
I LOVE using my glass pie dishes...
I think they cook more evenly and I just love the way they look compared to the little metal tins...
BUT those will work just dandy if that's what you have.  :0)

Okay, ready to roll???
;)

You will need a nice amount of pie dough in your hands,
I like to just mold it nicely into a small disc and then place it on my parchment paper that I've put just a little flour onto...
FLOUR TIP -- 
You only need to place your hand into your flour bowl
(Fingers out, just like you would do if you were going to trace your hand to make a lovely little turkey!) 
What comes out on your hand is plenty enough flour to add to your parchment paper...place your little disc down and do the same with the flour on your rolling pin...One hand print will do...You will reapply it as needed when the dough starts wanting to stick to the rolling pin.

Rolling pin in hand???
Let's get to it!


Roll a couple times back and forth (same direction) always starting in the center and working out.
This will ensure an even crust...if you start from the edges and work in...it's just not good, so don't do it. 
Then FLIP your dough and do the opposite side, back and forth.
If necessary, do again and again...

YOU do NOT need to make a perfect circle here, so don't even bother with such craziness...you will be cutting off any excess in a minute anyway, so save yourself the bother.

When it looks just as you'd like, roll your parchment paper and pie dough and then place over the top of your pie dish...this is so much easier than trying to lift the dough...
one sad note: 
GF pie dough is not as easy to work with as regular dough...it is a little more fragile and less forgiving...BUT never fear, you can always do a little patchwork if needed.  :0)

After you've got that pie crust in your dish just so...you can grab yourself a little butter knife and trim away the edges...super easy!  NOW, IF you are wishing to add a top crust, you will want to trim a little less so as to have some extra for adhering the top layer to.

After you are done there, add your favorite "insides"
This scrumptious looking one was a hit for dinner...
Cherry/Blueberry Pie,
yeah, it was gooooood!

Something to make note of here:
Make sure to NOT fill your dish TOO FULL
or it will just bubble out all over and make a nasty mess.
I fill it to just barely below the top of my pie dish.

Next, you'll add your top crust...
do just as you did for the bottom layer, rolling it up to place over the top...
this is where you may have to do a little patchwork...
I had to, sadly, but it still turned out pretty nice. 
And again...what matters the most???
The taste...
If it tastes yummy, they will get over it not looking Perfect!

If you add just a little water to your finger tips, it makes the two layers of crust stick together quite nicely as you flute the edges.

Make sure to put a few little slits (4 is fine)
to vent.  This will also help with not having it bubble over.

If you wish to make it adorable...
use your favorite little cookie cutter right in the middle.
(this is actually done prior to placing it on the pie)
I cut out the shape and set it to the side.
After the pie is all nice and ready for the oven, I place the little cut out shape right back in its place and let it bake...looks just cute as can be when it's baked!

If you like, you can add a dandy little wash over top to make it shine...

This again, would be done, PRIOR to BAKING...
Simply beat an egg and brush over the top,
then sprinkle evenly with a dusting of sugar.
YOU will love the shine!

Sadly, I left out that little detail prior to my baking, so no shine happening here, but next time, ya better grab your sunglasses cause I won't forget!!!
 
THIS NEXT STEP IS A SUPER, SUPER, SUPER IMPORTANT ONE!!!
Place your pie in your preheated oven ~
I chose to set mine at 400*
Move your bottom rack ALL THE WAY DOWN TO THE VERY, VERY BOTTOM!!!
That's the IMPORTANT part if you didn't catch it.
Your top will NOT burn and will turn out just lovely this way...
no need to do any covering of the edges at all...
AND the bottom crust turns out just right...
nice and flaky ~
none of that ooey, gooey, yucky mushy crust goin' on here!

Just cook until the crust is nice and golden on top...
I think mine cooked for about 4o minutes...just watch for that golden color.

Check it out!!!
And the next picture speaks for itself!

This pie was a hit!


So what do you think? 
A wasted day???
Or a day to treasure?


Thursday, November 15, 2012

Breakfast is served...

The following breakfast recipes are all gluten free...
but don't click away...
they are DELICIOUS!!!!
and they won't give you a tummy ache when you eat them.

It used to be that when I would make pancakes (also from scratch) that my little one would be rolling around on the floor, holding her tummy, crying...those days are over...no more tears ~ just smiles and happy tummies!

And the very best part...
I seldom tell people that what i am serving is gluten free and I end up hearing the nicest compliments such as, "These are the BEST pancakes I've ever had, are they from a box or a mix?" 
Never do I hear, "oh, these are pretty good for being gluten free." 
That's just an insult wrapped in a pretty bow.


(For the flour mixes below, simply go to my post titled:  Gluten Free Flour Recipes)


Pancakes
4 C All Purpose GF Flour Mix
2 tsp Xanthan Gum
1/4 C Sugar
1 tsp salt
2 Tbsp baking powder

Combine all dry ingredients in large bowl...
Mix the following ingredients together in a separate bowl
6 eggs
3 1/2 Cups Coconut Milk
(feel free to use any type of milk you desire, Coconut Milk that is vanilla enriched is my favorite!)
2 tsp Vanilla

Pour over top of dry ingredients and mix gently with wire whisk.
Stir in 1 Cup Melted Butter.

With 1/3 C measuring cup, pour onto hot griddle...
Cook until bubbly, then flip...should be nice and golden brown.
I will often use my spatula and "smash down" after cooking on the first side to ensure that they cook nicely all the way through.

So yummy!

Buttermilk Pancakes
Follow all dry ingredients for pancake recipe above

In separate bowl, mix together
6 eggs
2 tsp Vanilla
3 1/2 C Milk
1 Tbsp vinegar (this will make your buttermilk flavor)

Follow as you would for the regular pancake recipe adding the melted butter and cooking just the same.


German Pancakes
This will make one 9 x 13 pan...I usually double this recipe to feed my little army!
Preheat oven to 425*


1 Cup Featherlight mix
1/2 tsp Xanthan Gum
1/4 Cup Sugar
1/2 tsp Salt
1 Cup Milk
4 eggs beaten
1 tsp Vanilla

Mix dry ingredients together.  Mix eggs, vanilla and milk and pour over dry ingredients, mix well!
Put 2 Tbsp butter into your 9 x 13 baking dish and put into your oven for about 2 minutes until the butter is melted.  Tilt your dish to make sure the butter has full coverage on the bottom...then pour your pancake mixture into the dish and bake for about 18-20 minutes.
Watch to see the amazing creation happening in your oven ~ each time looks a little different!
Your edges may become a little crispy while the center continues cooking, it's okay...this may be my very favorite part!

You are sure to love this buttery dish...Serve hot with powdered sugar or syrup.

Golden Pancakes
This is a fairly small serving...so I don't make them quite as often.
This pancake is the most filling pancake I've ever tried!  They cook up so nicely, I love 'em!

In a blender combine:
2 Cups uncooked oats
6 eggs
2 Cups Cottage cheese
1 tsp vanilla
1/2 tsp cinnamon
2 tsp sugar

Blend until nice and smooth, about 1 minute.
Pour batter, 1/4 C each and cook on hot griddle.
Serve with fresh berries or syrup.

These are a great source of protein!!!


 To ensure that these are gluten free, just use gluten free oats.


In my opinion, you can never have too many great recipes for breakfast...more to come!!!  :0)

Gluten Free Flour Recipes

Okay...

Now we can get down to business...
with all the items you purchased from your shopping list in my previous post
I will tell you how to put them together to make all the yumminess your heart desires!!!

If you picked up your bulk items, just place them into 5 gallon buckets with screw top lids for ease...if you are anything like me, you'll be in them on a very regular basis.

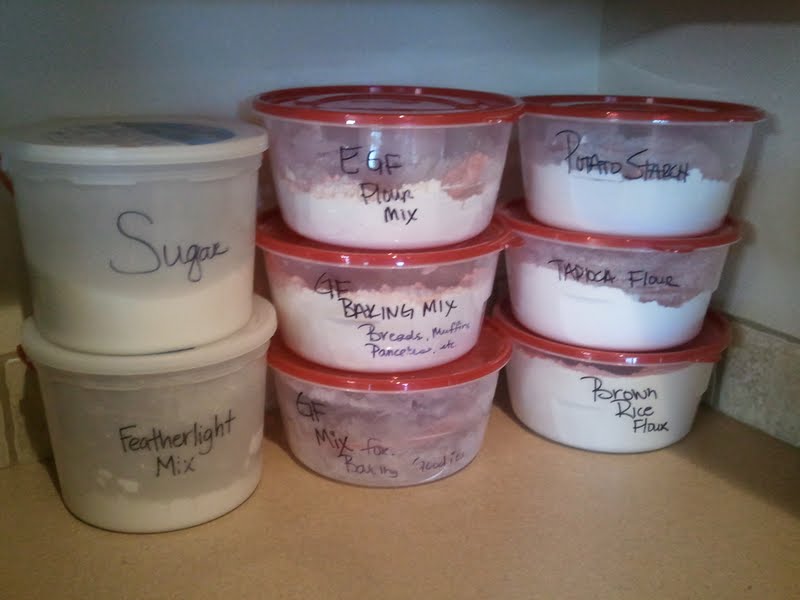
Now...I messed up and should have told you when you went out shopping to pick up a few extra containers to keep your mixes in...something like these maybe.


A few of these came from the dollar store and the others are just old ice cream buckets.
Anything will work!
I put my mixes together at least once a week and just keep them right out on my counter since I use them daily, you can do whatever works best for you.  :0)

Let's get to it!!!

Gluten Free (GF) Mix
6 Cups Brown Rice Flour
2 Cups Potato Starch
1 Cup Tapioca Starch

Gluten Free (GF) Goodie Mix
6 Cups White Rice Flour
2 Cups Potato Starch
1 Cup Tapioca Starch

Featherlight Mix
3 Cups White Rice Flour
3 Cups Cornstarch
3 Cups Tapioca Starch
3 Tbsp Potato Flour

All Purpose GF Flour Mix
6 Cups Featherlight Mix
2 C GF Mix

Each of these mixes can be stored for about 18 months with no problem...
I haven't had the chance to check that out personally, as I go through them weekly, but I do a lot of baking and a lot of cooking.

Next post:
Pancakes, Buttermilk Pancakes, German Pancakes and Golden Pancakes...Breakfast is served!

Gluten Free Baking ~ Shopping List

I am planning to add several recipes that are gluten free...
I LOVE to bake
and was so unhappy
when I found that my world
would have to become a Gluten Free World...
I was certain my days of delicious little goodies were a thing of the past. 
It seemed that almost everything I tried was nasty, or at best, barely tolerable.

This was not the way I intended to eat for the rest of my life
and I certainly wasn't willing to torture my family with less than desirable food!

So my quest began!
I have had several friends who have shared their secrets with me and to them I am very grateful.
Now I wish to share some of the things I have gathered and my own secrets to making baking a wonderful experience again.

FIRST AND FOREMOST are your flour recipes...
no longer will you just run to the store and pick up a bag of flour
or even grind your own...
you will have to be intentional in your baking in a whole new way.

BUT it is FUN and it is YUMMY AND it is so WORTH IT!!!

The things you will need first off are below,
the list is not too long and I'll try to give you a few tips to where I've found these items:

Brown Rice Flour ~ I pick this one up in bulk from Winco...if you go back to the bulk food section and ask them for it, they will order it in...not too pricey.

Tapioca Flour/Starch (these are the same...not sure why they didn't make it easy and just call them one or the other...but they didn't, so just know that you just need Tapioca) ~ Also available at Winco in bulk.

Potato Starch ~ not to be confused with Potato Flour ~ because you will need both and they serve different purposes.  I have been able to find Potato Starch at the Fred Meyer in the bulk section, kinda spendy.

Potato Flour ~ again not to be confused with Potato Starch...you need both.  I think I was only able to find this one at Jake's Gluten Free Store...comes in a small bag (you don't need much of this one, so a small bag will do quite nicely)

Cornstarch ~ just head on over to the bulk section at Winco for this item as well.  I was very surprised at how much of this I use...pretty cheap stuff.

White Rice Flour ~ this one is a good one to buy from your local Asian Stores...makes your goodies so good!

Xanthan Gum ~ This one will make you raise an eyebrow or two...quite spendy...but you don't use too much of it at a time...essential to have, so grab yourself some.  This is also found in the bulk section of Winco ~ BUT it is with all the spices, not in the bins...you'll be happy to know that if you didn't already.  :0)

That's about it, aside from the normal baking powder and soda and such...
I've found that I use a lot more baking powder than I had in the past and less baking soda. 
That might be a good thing to note for yourself.

HUGE NOTE!!!  Do yourself a big ol' favor and write what the contents of your bag are on the little tag, cause sure enough you'll get them home and not have the slightest idea which is which -- they look so much alike. 

My next post will contain the flour recipes...
so head to the store and pick up the things on your shopping list and get ready to bake!

(Note:  The items above will cover making all of your goodies from cookies to cakes to pies to pancakes, Belgian waffles, German pancakes, biscuits, rolls, french bread, flour tortillas, pizza crust, doughnuts, sweet rolls and muffins)

For a heartier whole grain style bread that is still Gluten Free...I will share some ideas with you a little later on.  :0)


Thursday, November 1, 2012

Where were we??? Ah yes, more recipes ~ # cuatro...

Here we go...ready for another yummy one?

This is such a refreshing dessert ~ perfect to serve after a nice, spicy meal.

For now, since I have so many asking for it, I'll just post this one and then asap I'll get the delish dinner that it compliments so well uploaded for you to enjoy. 

(Note:  this is great to make early afternoon before you prepare for dinner...it needs about 4 hours to chill, so get this perfect little dessert done and then you can enjoy your time making a beautiful dinner)
That beautiful dinner is coming up...so stay tuned.  ;)

LEMON DULCE CUPS

300 ml (equivalent to just a smidge more than 10 oz) Heavy Whipping Cream
1 can Sweetened Condensed Milk
3 lemons ~ juice and zest

Whip the cream until nice and fluffy.
In a separate bowl, combine the sweetened condensed milk along with the juice of three lemons.
Here comes the fun ~
grab out your handy, dandy lemon zester
and go to town zesting the lemons. 
Add the zest of 2 of the lemons to your mixture.
Gently fold the whipped cream in
and give it a little taste test...
Is it "lemony" enough for you???
If not, add a little more lemon zest...
Still not quite enough, add the juice of another lemon.
Some lemons are more potent that others and they vary in size, so do the taste test to make sure it's just how you'll love it.
When it's just right --
spoon it into pretty little dessert dishes.
Top with a couple raspberries, a sprinkling of lemon zest and a mint leaf for garnish.

The raspberries give such a wonderful little contrast of flavor
and the mint leaf just looks fabulous!

Place in refrigerator for 4 hours to chill...this allows it to set perfectly.

Watch the smiles as your family or guests enjoy this refreshing dainty dish.

Saturday, October 27, 2012

Halloween Cupcake Fun!

While I was in McCall, I learned a couple new tricks for cupcake decorating...

I just HAD to share the fun with my kiddos!
Check out our fun creations!!!

This morning, right after breakfast, we started in on baking the cupcakes, then making a super delicious salted carmel filling, followed up by scrumptious carmel butter cream frosting.  All of this required some serious patience...this does not flow freely through my home, but we survived!

We baked...
then cooled...
then poked holes in the center of the cupcakes...
We stirred the carmel mixture...
and we stirred...
and we stirred....
and we waited until it finally reached 360 degrees...
and then we stirred a little more...
We added caramel sauce into the cupcakes...
then added a little more...
We sampled ~ just to make sure it was all yummy enough...
it was, so we sampled again....
Then we made the frosting...
and we laughed...
the powdered sugar went flying...
so we added more...
and a little more....
and finally a smidge more...
It was finally ready...
spooned it into our trusty little bags...
but forgot to put the little tip in...
so we emptied that little bag out...
and gave it another shot...
Remember, the patience part...
Deep breaths...  :0)

Now back to business...
tip in....
frosting in....
bag end twisted up...
ready, set, frost!

Oh, no...you can't lick the end of the frosting...
or your fingers...
nope not even your thumb that you promise won't touch anything...
go wash up again. 
Love you, sweet little children...

Oh, the frosting was a hit...
I'm fairly certain there was more frosting than cupcake...

Then came the fun...
Well, more fun...we've already been deep in the fun world!
But this was a new kind of fun they've never experienced...
Spider Webs made from melty chocolate....

We made so many...
again, we had to do a little sampling
just to make sure they were tasty enough.

What a fun morning!!!
And so tasty...everything was even gluten free,
so delish you would never believe it!
I'd have to say we have mastered this whole gluten free baking world ~ Yippee!!!!

The kids loved it and so did I!
At this rate, my scale and I may never be the best of friends!
But my kids and I will be and that's so much more fun!!!


Friday, August 31, 2012

Gluten or Breathing???

Well, as hard as this transition may be...
I prefer breathing over eating all the bread and goodies my heart could desire...
cause really,
what good is it going to do me if my tongue and throat swell closed again??? 
Won't be any enjoying going on at that point!!!
And not being broke out in a million lovely red spots is pretty enticing in itself!

I'll be honest...
I was MORE THAN DEVASTATED
at the thought
of NEVER indulging in all these goodies again. 
Actually I was just flipped out about how to REALLY make this happen for the rest of my life...
HOW???
It just feels so BIG and quite daunting!

AND THEN
a dear sweet friend of mine came to my rescue!

Geri Gropp is an angel in my eyes!!!
She came to my home, made me breakfast, brought me a little care package of a few things I might need and the next day came and picked me up...we shopped for a few hours while she taught me all her tricks (well, I'm sure not all of them, but some GREAT ones!)
I don't know that I could have received a better blessing at this time...
AND she was soooo happy to help me with this.

Just tonight, I cooked up some biscuits to eat with the yummy shredded beef and creamy horseradish that I made...I'm smiling!!! 
They were really quite yummy...
IF I didn't KNOW they were gluten free, I would never have guessed! 
Hallelujah!!!!!!!!!!!!

Tomorrow I am going to attempt the brownies or chocolate cake...I'll give you an update!
Gotta have some delish chocolate happening in my world!!!  This is one I WILL MASTER very, very soon!!!

For any of my friends who are searching for some answers to help make your body and the bodies of your precious family a little healthier, I highly suggest you run out and pick up this book:
 
Eating Gluten Free Presents
More From
LIFE
TASTES GOOD
AGAIN
by Betsy Thomas & Kirsti Kirkland
Eating Gluten Free, LLC
I also see that they have a website and a blog...gonna have to check those out!
www.eatingglutenfree.com    www.lifetastesgoodagain.blogspot.com

I picked this little treasure up from Jakes Gluten Free Store on Fairview (between Eagle and Cloverdale) 
I particularly like this book BECAUSE they share many secrets on how to put together different FLOUR MIXES...takes so much of the guess work and the trial and error away! 
Jakes had a pretty fine selection of "stuff" to choose from. 
I will say none of it is very cheap, but for some things, it is the only place to make your purchase.  
Most of the things we needed were found in the bulk section of Winco...prices weren't terrible. 
I was able to order in bulk from them and I am READY to get going on this adventure.

I've known for such a long time that I REALLY needed to do this, I've been told repeatedly to GET AWAY FROM GLUTEN, but that isn't always as easy to do as to say.
I have dabbled in and out of it...just not seriously enough ~ UNTIL my little ER visit....nothing like one of those mornings to wake you up and make you take life a little more seriously!!!

Another place I would encourage you to take a little jog on over to is this GREAT BLOG...www.lovinlivinhealthy.blogspot.com.  Geri has devoted the past four years of her life to living gluten free and she is an inspiration to me as I begin down this same road. 
Thanks again Geri for giving me hope and not making this so SCARY...love you to pieces, girlfriend!!!

IF you are gluten free and you have some recipes that YOU JUST LOVE...PLEASE SHARE!!!

Food is meant to be enjoyed and I would love to enjoy some really great stuff!